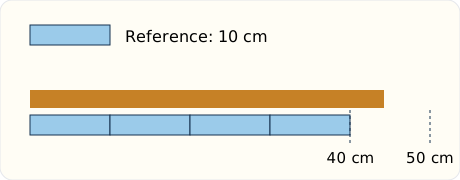
 The drawing shows the comparison; its size on a screen is not a ruler you can trust for measuring a real object.
Back to the on-screen lesson ·
Guessing before measuring, and having something to compare against.
Paper packet. Every task here also exists on screen, where it is checked automatically; answers written on paper are not assessed by Nydus. When you are back at a device, enter your answers there.
In this lesson you estimate a length before measuring it. The way to get good at it is to carry a few measured reference lengths, such as a ten-centimeter strip or a one-meter string, and compare. Estimating first also means a wildly wrong measurement gets noticed, which is a habit worth having for every measurement you will ever take.
You can compare two lengths by lining up their starting ends and seeing which reaches farther. You can also lay equal units end to end without gaps or overlaps. An estimate uses those ideas before an exact measurement is made. It is a reasoned amount, not a number chosen without looking. We will choose a unit, use a measured reference, and check how close our estimate comes.
| Term | What it means |
|---|---|
| estimate | An approximate amount based on useful information. |
| benchmark | A known reference length used for comparison. |
| standard unit | An agreed unit whose size stays the same, such as a centimeter or inch. |
| interval | The distance between two marks on a scale. |
| difference | How far apart two amounts are when compared in the same unit. |
A ten-centimeter strip gives you a reference for estimating a longer ribbon. Imagine copies of that strip laid along the ribbon with no spaces between them. Four copies and a little more suggest a length above forty centimeters. A fifth full copy would reach too far, so the ribbon is shorter than fifty centimeters.
Another way: steps
Choose the length to measure. Choose a unit and a known reference. Estimate by comparing. Measure with a suitable tool. Compare the result with the estimate.
Before estimating, name the distance you mean. A book has a height, a width and a thickness. Asking how long the book is can leave a partner unsure which two ends to use. Say the width of the closed book from left to right, or the height from the bottom edge to the top edge. Touch the two endpoints. Two different answers may describe different distances rather than different skill at measuring.
For a small object, a small standard unit is useful. Centimeters work well for a pencil or a book. Meters work well for a room or a long piece of string. Inches can describe a crayon, and feet can describe a room. One foot contains twelve inches. One meter contains one hundred centimeters. We will use those relationships when comparing measurements, but our first job is to choose a unit that makes the length easy to describe.
A large unit does not make an object larger. A desk described in centimeters is the same desk when described in meters. More small units are needed to cover it. Fewer large units are needed. Imagine covering a path with short tiles and then with longer tiles: the endpoints stay fixed while the number of tiles changes. Never compare two bare numbers without checking their units. Thirty centimeters and thirty meters describe very different lengths.
Keep the unit in an estimate. About twenty is unfinished; about twenty centimeters tells a partner what to imagine. Write the unit beside the number before you measure, so you do not quietly change the unit afterward to make the estimate look closer.
A benchmark should be a length you have checked. Measure a strip that is ten centimeters long, a strip that is one inch long, or a piece of string that is one meter long. Label it. Then compare familiar objects with that reference. You might find a pencil close to two ten-centimeter strips or a shelf close to one meter. Your memory now has something specific to use when the tool is put away.
Body measurements can help only after you check your own. Children have different thumb widths, hand lengths and step lengths. A thumb is not automatically one centimeter long, and a child's step is not automatically one meter. Measure the particular body length you want to use. Record both what you measured and its approximate size. If your hand span is fifteen centimeters, three spans give an estimate near forty-five centimeters, provided you place them carefully. Someone else's hand span may give a different count.
Practice comparing before doing arithmetic. Is the object shorter than one reference strip? Is it close to two strips? Is it between four and five? These questions can give useful bounds even before you choose a single estimate. For a ribbon between forty and fifty centimeters, forty-five centimeters might be a reasonable estimate if it looks near the middle. If it is much closer to forty, choose a value closer to forty. The evidence should guide the choice.
A picture can show a comparison without giving a real-world size. A printed or onscreen ruler may be resized. Use an actual measuring tool for the reference you will carry into the room. In a diagram, use the supplied labels and equal-spacing information instead of measuring the display with your finger.
To estimate with a short strip, imagine or place equal copies from one end of the object to the other. Start the first copy exactly at the chosen endpoint. Put the next copy where the first one ends. Gaps make the covered distance larger than the counted strip lengths. Overlaps make it smaller. If you use a movable strip, mark each endpoint lightly before moving it so that you do not lose your place.
Suppose a reference is about three centimeters long, and a row uses six copies. Count three, six, nine, twelve, fifteen, eighteen. The row is about eighteen centimeters long. Six is the number of copies, while three centimeters is the length of each copy. Adding six and three would mix those two jobs and would not describe the row. Repeated addition works because each copy contributes the same length.
The word about remains important. If the reference was only approximately three centimeters, six copies give an approximate total. A calculation can be exact about the numbers used while the physical estimate remains approximate. Do not claim that the row is exactly eighteen centimeters unless the measuring information supports that claim. Unequal paperclips also need care: knowing one paperclip's length does not tell you the total length of several different paperclips.
A leftover piece can help you improve the estimate. Four ten-centimeter copies cover forty centimeters. If about half another copy remains, estimate about forty-five centimeters. You do not need to write a fraction calculation to use a familiar half-strip as a comparison. Explain the whole copies first and then describe the remaining part.
After recording an estimate, choose a tool that fits the object. A ruler is convenient for a pencil or a short strip. A meter stick or yardstick reaches farther along a straight edge. A flexible measuring tape can follow a curved edge or go around an object, though the distance around is a different measurement from the straight distance across. State which distance your task needs.
For a straight length, line up the object's start with the zero mark, not automatically with the physical end of the ruler. Some rulers have a small blank edge before zero. Keep the tool straight along the object and read the mark at the other end. Count the equal spaces between marks, not the marks themselves. A segment from zero to five covers five unit intervals even though six labeled positions may be visible.
If the tool must be moved, mark the end of each placement and continue from there. Do not leave a gap or restart before the previous end. Record the completed lengths and any last piece. An estimate can alert you to an error in this process. If a table looked about one meter long but you record nine centimeters, check the unit, the starting mark and whether you forgot some placements before trusting the record.
Use the same endpoints for the estimate and the measurement. Estimating the full pencil and then measuring only the unsharpened part would not be a fair check. If the task asks for the nearest whole centimeter, follow that instruction. If the endpoint lies exactly on a marked whole unit, read that unit directly. Different recording rules can produce different written results for the same object.
Keep the estimate beside the measured length instead of erasing it. Suppose you estimated a strip at thirty centimeters and measured it at thirty-four centimeters. The estimate was four centimeters too short. You can find the difference by counting on from thirty to thirty-four, or by subtracting thirty from thirty-four. The comparison tells you how to adjust your mental reference next time.
For an estimate of forty centimeters and a measurement of thirty-seven centimeters, the estimate was three centimeters too long. Subtract the smaller value from the larger to find how far apart they are, then use the story to say which is longer. A difference alone does not tell the direction. Write both the number of centimeters and whether the estimate was above or below the measurement.
Two estimates can be equally close. If the measured length is twenty centimeters, estimates of eighteen and twenty-two centimeters are both two centimeters away. A larger estimate is not always worse, and a smaller estimate is not always better. Compare each distance from the measured result. For nearby classroom lengths, a difference of one centimeter is closer than a difference of five centimeters. Be sure all values use the same unit first.
An estimate should be honest evidence of what you thought before measuring. Its purpose is to develop judgment and notice surprising results. If your estimate is far away, explain what led you there. Perhaps your reference was shorter than you remembered, you counted the start as a full strip, or you chose the wrong dimension of the object. A useful correction names the cause and a better method. Repeating the estimate with a checked reference gives you a way to improve rather than simply trying to guess the hidden answer.
A class wants a paper border across a noticeboard. Before unrolling the paper, a learner uses a measured thirty-centimeter ruler as a reference and estimates that the edge is about three ruler lengths. The estimate is about ninety centimeters. Measuring the same edge carefully gives ninety-four centimeters, so the first estimate was four centimeters too short. The class uses the measured length when cutting because a border that is too short would leave a gap. The estimate still helped: it showed roughly how much paper to bring and provided a check against recording an unlikely nine-centimeter result. Record both numbers with their units so another group can understand the decision.
A learner checks a crayon and a table using different tools. A small ruler is convenient for the crayon, while a meter stick reaches much farther along the table. Before measuring, the learner estimates the crayon at eight centimeters and the table at one meter. Actual measurements are nine centimeters and one hundred six centimeters. To compare the table estimate with its result, first name one meter as one hundred centimeters. The estimate is six centimeters short. The crayon estimate is one centimeter short. This comparison uses consistent units and the same endpoints for each object. It does not claim that every crayon or every table must have these sizes; these are the objects in this classroom investigation.
A body's size is not a standard unit shared by everyone. Check your own reference before using it. Do not count ruler marks as unit lengths: count intervals. Do not remove the word about from an answer based on an approximate reference. Finally, a bigger number does not always mean a longer object when the units are different.
Read the reference.
One strip is about 5 cm long.
Its known length provides a benchmark.
Count the copies.
A ribbon fits about 4 strips.
Every copy contributes the same length.
Combine the lengths.
5 + 5 + 5 + 5 = 20.
End-to-end lengths add.
State the estimate.
The ribbon is about 20 cm long.
An approximate comparison gives an approximate answer.
Plan the check.
Measure the same ribbon from the same starting end.
The estimate and measurement must describe the same distance.
Read both records.
Estimate 25 cm; measurement 29 cm.
Both describe the same strip.
Check the unit.
Both use centimeters.
Their numerical difference can be compared directly.
Find the larger value.
29 is greater than 25.
The estimate was too short.
Find the distance apart.
29 - 25 = 4.
Subtraction gives the difference.
Label the conclusion.
The estimate was 4 cm too short.
Direction and unit explain the result.
Check by adding back.
25 + 4 = 29.
The difference connects the two records.
Read the actual length.
A shelf measures 83 cm.
This is the reference for both comparisons.
Read the estimates.
Mina estimated 75 cm; Luis estimated 90 cm.
Both used the same unit.
Find Mina's difference.
83 - 75 = 8 cm.
Her estimate is below the measurement.
Find Luis's difference.
90 - 83 = 7 cm.
His estimate is above the measurement.
Compare the differences.
7 cm is less than 8 cm.
The smaller distance means a closer estimate.
State the decision.
Luis's estimate is closer by 1 cm.
8 - 7 = 1 compares the errors.
Check the reasoning.
An estimate can be above the measurement and still be closer.
Closeness depends on distance, not which side the estimate lies on.
Read the two lengths.
Estimate 50 cm; measurement 46 cm.
The unit is already the same.
Compare their sizes.
50 is greater than 46.
The estimate is too long.
Find the difference.
Check the conclusion.
Each of 9 equal paperclips is about 2 centimeters long. About how long is their line laid end to end without gaps or overlaps, in centimeters?
answer centimeters
Match each estimate for the distance across a classroom to whether it is sensible or not sensible.
| a sensible estimate | not a sensible estimate | |
|---|---|---|
| about 8 meters | ||
| about 8 centimeters | ||
| about 8 kilometers |
A classroom investigation recorded these approximate lengths. Put the recorded objects in order, from shortest to longest.
Number the steps in order (write the number in the box):
Audio transcript: None
A strip was estimated at 39 cm and measured at 41 cm. How far apart are the records?
Check the records.
Both lengths use centimeters.
The values must use the same unit.
Subtract the smaller value.
41 - 39 = difference cm.
The difference is the distance between the records.
Describe the direction.
The estimate was shorter than the measured length.
The measured value is larger.
Each of 5 equal paperclips is about 2 centimeters long. About how long is their line laid end to end without gaps or overlaps, in centimeters?
answer centimeters
Each of 4 equal paperclips is about 5 centimeters long. About how long is their line laid end to end without gaps or overlaps, in centimeters?
answer centimeters
Each of 9 equal paperclips is about 6 centimeters long. About how long is their line laid end to end without gaps or overlaps, in centimeters?
answer centimeters
Each of 8 equal paperclips is about 4 centimeters long. About how long is their line laid end to end without gaps or overlaps, in centimeters?
answer centimeters
Each of 4 equal paperclips is about 3 centimeters long. About how long is their line laid end to end without gaps or overlaps, in centimeters?
answer centimeters
Lesson test: one question per skill, one attempt each, no hints. Your answers are checked when you submit.
A classroom strip measures 42 cm. Estimate A was 37 cm and estimate B was 54 cm. Complete the differences to compare their accuracy.
| A's error (cm) | B's error (cm) | Difference between errors (cm) | |
|---|---|---|---|
| Accuracy comparison |
You can estimate a length and check it by measuring. Without looking: how could a measured ten-centimeter strip help you estimate a longer ribbon?
16. Check a long estimate, step 3
50 - 46 = 4 cm.
The difference measures how far apart they are.
16. Check a long estimate, step 4
46 + 4 = 50, so the estimate is 4 cm too long.
Adding the difference recovers the estimate.